Create an Apple ID without a card for iPhone. What is Apple ID and how to create it.
- How to choose an Apple ID region
- How to create an Apple ID
- Telephone in Moscow: 8 (495) 648-63-62
- Go to the site Apple ID
- Fill out the form to create an Apple ID
- Email Verification to Create Apple ID
- Enter code for Apple ID
- Done!
- Create ID
- Create an ID through iTunes
- Create ID via iPhone
- How to change ID?
- Apple ID with iTunes
- Apple ID using iOS device
- Create an Apple ID without billing information
Apple ID - the key to almost all the features of the iPhone, iPad and Mac. An account is required to download applications from App Store , iMessage correspondence, iCloud data storage, and more. How to create an Apple ID on iMac, iPhone and iPad, how to register an account without a bank card and which Apple ID region to choose, read in our material.
How to choose an Apple ID region
Often, users from Ukraine, Russia and other CIS countries are wondering which Apple ID region to choose. There are usually three options: Ukrainian, Russian and American. The following parameters affect the choice:
Apple service availability and pricing
Availability and cost of Apple services vary by region Apple ID. For example, Apple Music is available in Ukraine, the United States and Russia, but in the latter an important component of the music service - Radio Beats 1 - does not work. Different price tag for a monthly subscription. In the USA it is $ 9.99, in Ukraine it is $ 4.99, and in Russia it is 169 rubles, which is about $ 3 in terms of dollars.
App Store Availability and Pricing
The application catalog in the App Store from country to country is practically the same, but rarely there are situations that some programs are in the American App Store, but not in the Russian one. This feature will rarely make itself felt, but you need to talk about it. Application collections and tops also vary by region. They are usually more relevant to the inhabitants of a particular country.
The ability to link your bank card to your Apple ID
Apple ID works only with bank cards from your region. You will not be able to tie up the Ukrainian card to the Russian Apple ID without any tricks. Also, it will not work for the American Apple ID to tie a card from a country other than the United States.
How to create an Apple ID
How to create Apple ID on Mac / Windows
How to create an Apple ID on Mac / Windows without a bank card
Telephone in Moscow: 8 (495) 648-63-62
The first thing to do after iPhone activation - register Apple ID, which will later be your ID when you visit the app store for iPhone - App Store.
Apple ID is required not only to purchase applications, but also to download free programs from the App Store, such as iBooks, Skype and others. Without an Apple ID, you can’t install a single program from the App Store, and if you don’t, then why spend money on a smartphone at all.
The procedure for activating the iPhone suggests Apple ID registration as one of the steps, but the reality is that this step is usually skipped. As a rule, the device is activated by the seller, thus demonstrating the operability of the device, and Apple ID registration requires the introduction of personal information, including the number credit card owner, and the seller skips this step, leaving the buyer to enjoyment.
The buyer, especially when confronted with the procedure for the first time, cannot always go through the registration procedure from the first time. One of the common difficulties is the password format: the password must contain Latin letters and numbers, at least one of the letters must be capitalized. Another common mistake is that when registering an Apple ID, people specify an email address, go through the entire registration process and cannot complete it because they do not have access to the email address specified in the registration data in order to activate their Apple ID by following the link from the email sent to this address. address.
If you do not have an Apple ID, and you want to register it, you can go to the beginning of registration in the following way.
Enter Settings (on the main screen, click the Settings icon).
Select from the list the item "Store" (or "App Store" in English).
Select “Login” and in the pop-up menu select the item “Create a new Apple ID” .
You have entered the beginning of the registration process. Further fill in the offered fields of the registration form. Some tips for filling out.
You must fill all fields. If automatically filled in information suits you - click the Next button, and the next form screen will open. It is not necessary to read all 49 pages of the “Terms of Service”, you can immediately click on the “Agree” button. If you do not click it, then registration will not go any further anyway - there are no options here. Your acceptance of the terms of service will need to be confirmed again in the pop-up window, to do this, click again “Agree”.
Email - specify your available email address;
Password - set a password consisting of Latin letters (at least one capital letter) and numbers, at least 8 characters long. It is forbidden to use spaces and more than 2 identical characters in a row.
Verify - enter the password again (confirm the password).
Question - a question is required, for example, the question is: “What is the name?” (What is the name?)
Answer - enter the answer to this question that you will remember exactly. This question and answer will help you recover your password if you forget it.
The “Subscribe” switch is set to on by default, which means you agree to receive newsletters from Apple with news and offers to buy some programs. Leaving “Subscribe” on or off is your own business, it does not affect the further registration procedure.
If you entered everything correctly, the system will skip you to the next registration step; if not, it will highlight its objections in red over incorrectly filled fields. Correct the errors and click “Next” again. Do not be discouraged if from the second time the system gets to the bottom of something - correct the information in the fields marked in red and win!
The next stage concerns billing information. You are required to enter the data of the credit card from which the App Store will write off the payment for the programs and media content you purchase. Bank card data will have to enter for registration Apple ID, even if you are basically going to use only free software. Apple is deservedly proud that among its registered users there is a very high percentage of solvent people - information about the means of payment (bank card) when registering an Apple ID gives reason to think so.
Any bank card, credit or debit, with a verification CVV code (three separate digits for back side cards in the case of VISA and Mastercard, or four digits on the front of the card in the case of American Express).
For ideological supporters of cash and opponents of transferring your card’s data via the Internet, it is recommended that you use Apple Standard Gift Cards - unnamed, fixed-denominated cards of 1,000, 3,000, 5,000, 10,000, 15,000 rubles for the purpose of registering an Apple ID and then paying for purchases on the App Store. , have all the necessary details, including the CVV-code, to pay for purchases in the App Store.
The card can be purchased at Russian Standard Bank branches.
After you successfully complete all the registration form fields, your Apple ID registration application will go to the Apple server, which will automatically send you an email with a link to the Apple ID activation page to the email address you provided during registration. All that is required of you is to receive a letter and follow the link indicated in it. From the moment you click on the link from the activation letter, your new Apple ID will become active and an amount equivalent to 1 US dollar will be deducted from your card (a test transaction confirming the card’s performance), after some time the money will be returned back.
I hope you have written down or remembered the password, as it will be needed later. Login is difficult to forget because it is your email address.
Congratulations! Now you are a registered user of App Store and can download paid and free programs from the app store.
More about registering and using Apple ID by iPhone, iPad and Mac users.
An Apple ID is required to install applications for the iPhone and iPad, use Apple services (for example, iTunes), and many other things related to Apple products. Creating an Apple ID is easy, see for yourself.
Go to the site Apple ID
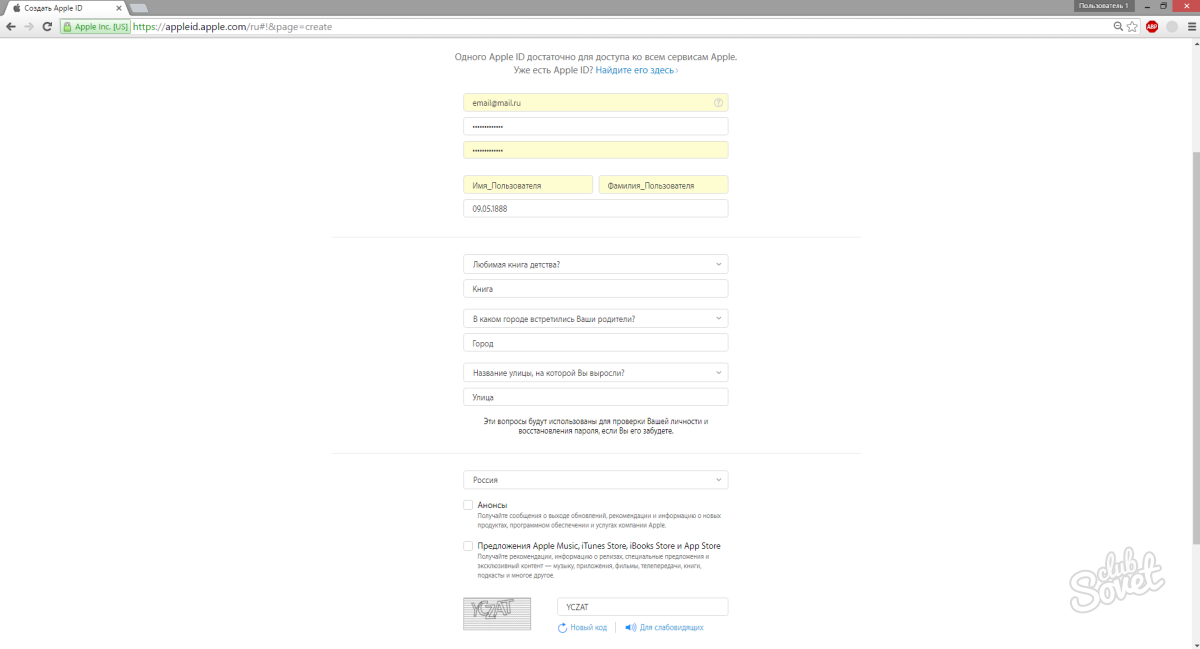
Go to the website appleid.apple.com and click on the button "Create Apple ID" (highlighted in red frame).
Fill out the form to create an Apple ID
Enter your real email, first name, last name and date of birth. When choosing a password, note that it should contain:
- more than 8 characters;
- lowercase and uppercase letters;
- numbers.
Also do not enter the answers to secret questions just like that, use real information that is easy to remember. You will need them in the future to change and recover your password.
At the bottom, check off if you want to receive information about updates and hot offers in Apple stores.
Email Verification to Create Apple ID
After filling out the questionnaire, you specify email will receive a letter with a code. It takes only 3 hours, so do not hesitate.
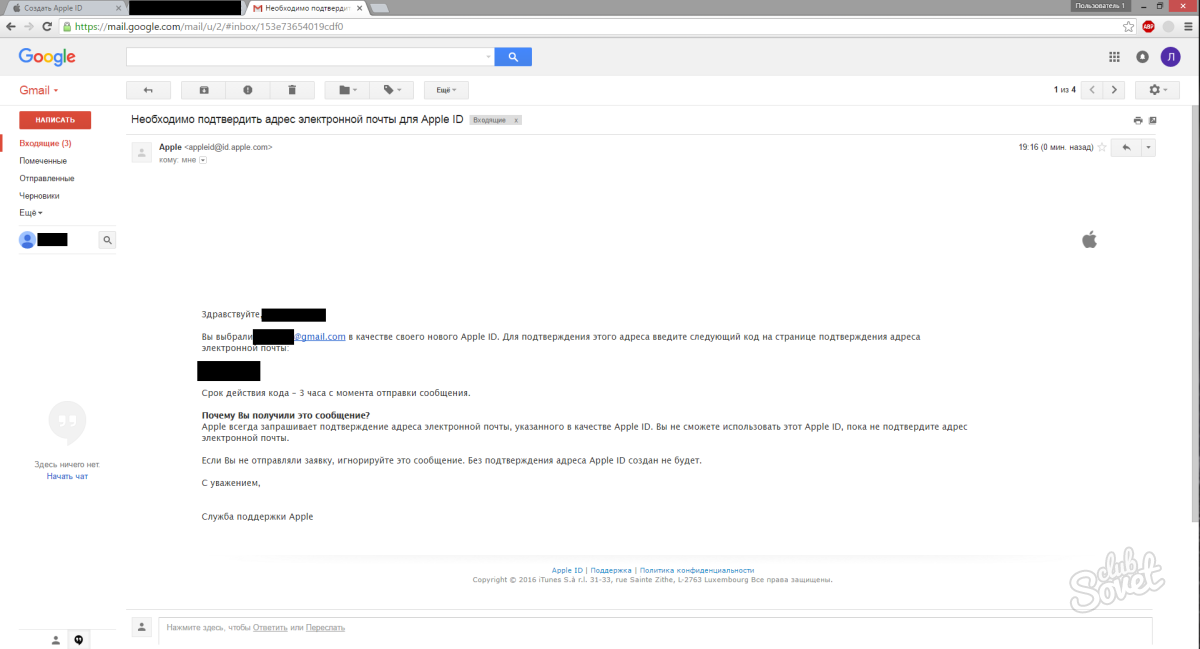
Enter code for Apple ID
Return to the Apple ID site and enter the code you received.

Done!
You have created an Apple ID. Now, using it to log in, in the field "Apple ID" enter the email with which to register.
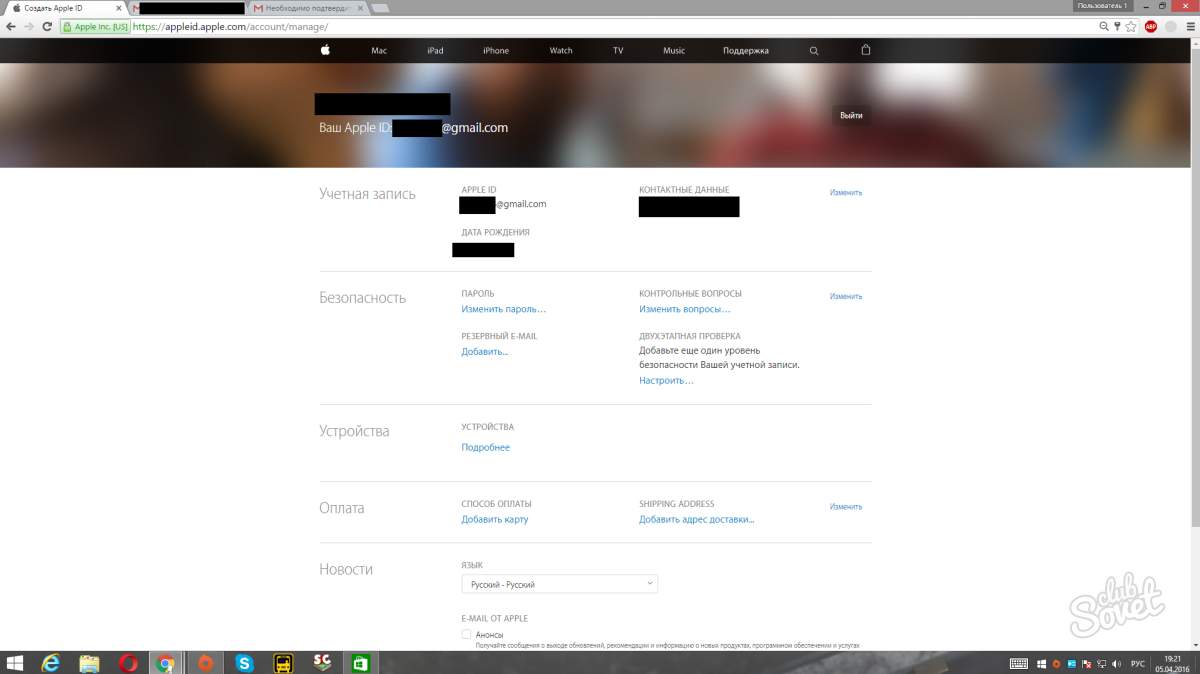
Now with using Apple ID you can download applications on the iPhone, make purchases at various Apple services and much more.
Each iOS user needs an Apple ID, without which the user will not be able to either install the program on his gadget, make a purchase in the App Store, or communicate via iMessage. In short, without a unique Apple account, no service of an American company will be available to the user. This article will tell you how to create, learn and change the ID on the iPhone (iPhone).
Create ID
You can make an Apple ID as with using iTunes on the computer, and directly from the device. Let us consider both methods.
Create an ID through iTunes
- We download iTunes from an official site of Apple and we install, following prompts of the master of installations.
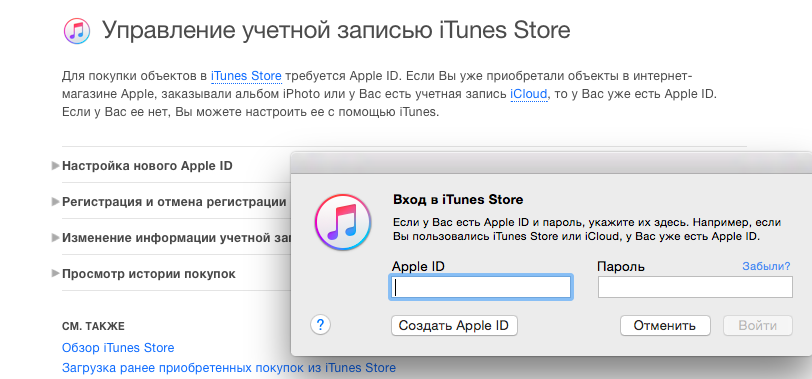
- Open iTunes, in the store menu ( iTunes Store ) select the item "Create account "(Create Apple ID).
- We click "Continue" twice, the first click confirms the desire to create an ID, the second one accepts the user agreement.
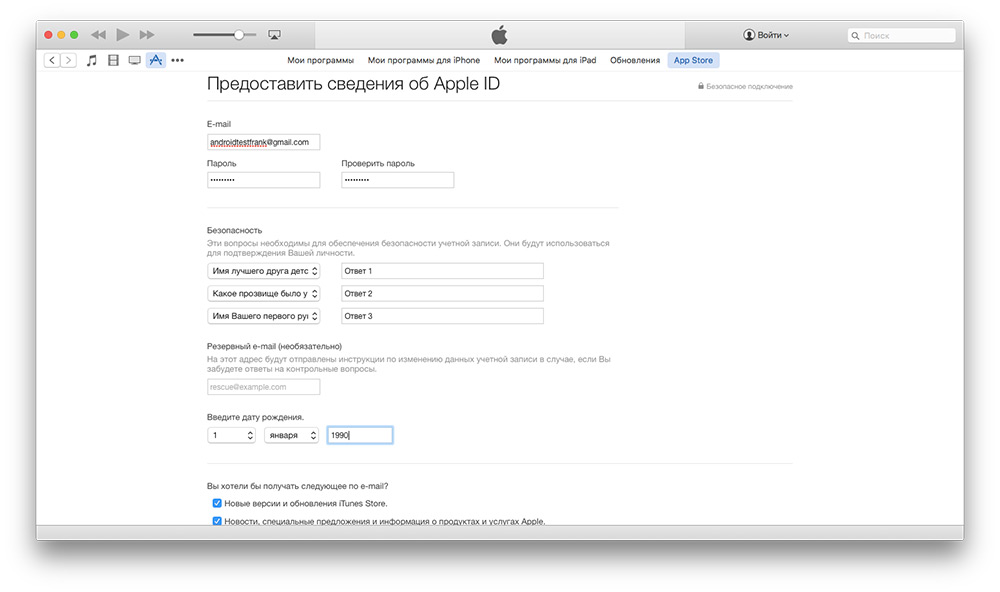
- In the window that appears, specify the necessary data - e-mail, password (password), secret question and answer (security Info), additional e-mai (optional rescue e-mail), date of birth (enter your date of birth). In the field “Would you like to receive the following via email?” We tick the box if we want to receive company news.
- Confirm the settings by clicking "Continue".
- In the next window, you must enter your billing information. This data will be used to pay for purchases in the App Store and other Apple services.
- We check the entered data, click the button "Create Apple ID" (Create Apple ID). Everything! It is done!
Create ID via iPhone
- Go to "Settings", then "iTunes Store, App Store", select "Create a new Apple ID".
- In the subsequent windows we indicate the country of registration and confirm the user agreement, click "Next" (Next) and "Accept" (Agree), respectively.
- In the following windows we enter data in the same way as points 4 and 6 of the previous instruction.
Tip! If you want to add an id without specifying the payment data of the card, in the "Payment method" field, select the "None" item. - Check the data, click "Next." Everything! ID created.
How to find ID?
Solving this problem is very simple: you just need to go to the "Settings" of the gadget and select "iTunes Store, App Store". In the window that appears in the upper field will be registered Apple ID.
How to change ID?
Go through the path "Settings / iTunes Store, App Store", select the Apple ID field, in the drop-down menu, select "Exit". The "iTunes Store, App Store" window will be updated, in it you will be asked to log in with a different ID or create a new one (see the first instruction).
In general, the creation of Apple ID and further manipulations with it are not so difficult tasks, any user can cope with them. Read more about working with articles in our section.
To work with any iOS gadget, you need an Apple ID - a special account that will allow you to work with all the special Apple services - iTunes, App Store, etc. This article will tell you how to create a new Apple ID.
Apple ID with iTunes
- Install on computer iTunes . The download file is best downloaded from the official Apple site. Follow the link, specify the version you want to download, enter the e-mail and click the "Download" button.
- Open iTunes, go to the iTunes Store tab, click the "Sign In" button.
- In the window that appears, select the item "Create Apple ID".
- We confirm our desire to create an ID by clicking "Continue" (Continue), then we accept the user agreement by clicking "Agree" (I agree).
- You will see the parameters window, we specify:
- Email - email address;
- Password - password;
- Security Info is a secret question;
- Optional Rescue Email - "spare" email address;
- Enter your date of birth - date of birth;
- Would you like to receive the following via email? - tick this box if you want to keep abreast of Apple news.
- Press the "Continue" button, get into the window for entering payment information parameters. This is necessary for making purchases in iShops.
- Click "Create Apple ID" (Create Apple ID), check the email specified during registration ID, go to the sent link. Everything! Apple ID is created and activated!
Apple ID using iOS device
- We take your iPhone or iPad, go to "Settings", then iTunes Store, App Store and select "Create a new Apple ID".
- Select the country in which the ID is registered, click "Next" (Next).
- Accept the user agreement by clicking "Agree".
- Enter all the required data by analogy with step 5 of the previous instructions.
- Enter your billing information, click "Next".
- Go in email box specified when creating an ID, follow the link indicated in the incoming letter. Record created and activated!
Create an Apple ID without billing information
Many users are afraid to specify their credit card details when registering, but there is a way to get an Apple ID without specifying payment information. For this:
- Go to iTunes and in the "iTunes Store" menu, select "App Store", go to the "Top Free Apps" section (Top free apps).
- Choose any necessary free application and click on the "Free" post under its icon.
- Click the button "Create Apple ID", follow steps 4.5 of the first instruction.
- In the billing data entry window under the inscription "Please select a payment method", select "None", click "Create Apple ID". Done! Now you have the ID and your first application downloaded with it. Do not forget to go to the mail specified during registration and follow the link in the corresponding letter. So you activate your ID.
In the field “Would you like to receive the following via email?
How to find ID?
How to change ID?